SOA 12c End-to-end (e2e) Tutorial:
https://java.net/projects/oraclesoasuite12c/pages/SOASuite12cEnd-to-endTutorial
During this tutorial you may have problems deploying the application ValidatePayment (Page 74 of the tutorial). This error occurs when your Oracle Service Bus and Oracle Business Process Manager are on the same domain.
ERROR:
WSDL Errors Can Occur When Oracle Service Bus and Oracle Business Process Manager Are on the Same Domain
Bug: 18856204
Added: 10-June-2014
Platform: All
If Oracle Service Bus is installed on the same domain as Oracle Business Process Manager (BPM), the following error can occur when creating a WSDL file:
The WSDL is not semantically valid: Failed to read wsdl file from url due to — java.net.MalformedURLException: Unknown protocol: servicebus.
WORKAROUND:
1. Log in to the WLS Administration Console
2. On the navigation tree on the left, expand services and click OSGI Frameworks

3. Click on the bac-svnserver-osgi-framework link

4. Click lock and edit

5. In the init properties text field at the bottom add felix.service.urlhandlers=false

6. Click Save and activate the changes
7. Restart Weblogic Server
Updated: 2014/08/14
Carol Thom from Oracle informed us that this solution might cause issues with BPM.
Other solution to this problem is to remove the OSGi Framework from the AdminServer.
To do this replace the step 5. with the following instructions.
5. On the Targets tab, clear the AdminServer check box.

Thanks to Carol Thom for sharing this information with us, and Da Dinh who gave her the information.
| PreSales |  | 1 Specialist GLP |
| Implementation | | 1 Specialist GLP |
| Support | | 1 Specialist GLP |
In this post I will describe a solution to dynamically change the JMS destination queue in run-time, using business rules.
Start by creating your business rules to decide the destination of your your message.
In this example I’m using information about the source of the message, the routing info name and value. In your case implement the validation of the fields that are important for you to decide the destination of your message.

Description of “Routing Rules Example”
After processing the following message:
Description of “Routing Rules Output”
The routing rules added the JMS “jms/Lab1TemplateJMSQueueV1” to my target JMSDestinationName.
Assign your JMSDestinationName to a variable.
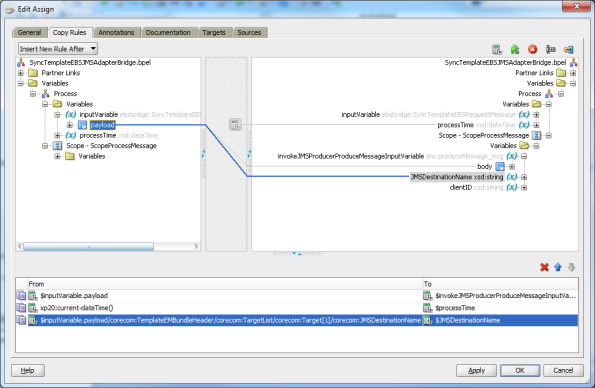
Description of “JMSDestinationName Assign”
Now to configure your JMS adapter to send the message to your new JMSDestinationName, all you need to do, is to set the property jca.jms.JMSDestinationName of the adapter with the value of your JMSDestinationName variable.

In Oracle ADF applications, sometimes we need to trigger Contextual Events programmatically on action listeners or another kind of listeners because some ADF Faces components don’t have out of the box Contextual Event configuration through Property Inspector. Rich Command Menu Items, Rich Command Navigation Items and Rich Command Buttons are some examples of these components.
In most of the cases we want to pass a complex payload with information about the Contextual Event. How to pass it?
Solution
The solution is to pass a class that represents the payload, instantiate it on launching the event and casting to it on handling. In this tutorial I created a page with two regions:
- a top region that contains a menu that launches the event with information about the button pressed and a value of an inputText
- a bottom region that catches the event updating an outputText.
Download here CEPayload.zip .
Payload class
First you have to create a Java class representing the payload. In the provided example, it’s being passed a color and a username:
package pt.linkconsulting.cepayload.payload;

public class MenuEventPayload {

    private String color;

    private String username;

    public MenuEventPayload() {

        super();

    }

    public MenuEventPayload(String color, String username) {

        super();

        this.color = color;

        this.username = username;

    }

    // getters and setters

    ...

}
Publisher
Before launching the Contextual Event, you should publish it on publisher’s page definitions as usual like in the following example:

Then in the event listener method of the publisher side you must import that class and include the following code:
//get the eventBinding and its dispatcher
JUEventBinding eventBinding =
    (JUEventBinding)BindingContext.getCurrent().getCurrentBindingsEntry().get("eventBinding");

EventDispatcher eventDispatcher =
    ((DCBindingContainer)BindingContext.getCurrent().getCurrentBindingsEntry()).getEventDispatcher();

// create the payload
MenuEventPayload menuEventPayload =
    new MenuEventPayload(color, username);

eventDispatcher.queueEvent(eventBinding, menuEventPayload);
Subscriber
In the subscriber side, do the usual job to handle Contextual Events, except in the last step.
Create a Data Control from the class with the method that will handle the event:

Register the method in the bindings:

Register the in page definition’s event map:

And finally you must import your payload class and cast the argument to it:
public void handleEvent(Object payload) {

    MenuEventPayload menuEventPayload = (MenuEventPayload) payload;

    String color = menuEventPayload.getColor();

    String username = menuEventPayload.getUsername();

    // use these parameters to update your subscriber region

    ...

}
Now you are ready to run your app.
References
I noticed this problem using JDeveloper 11.1.1.5 and WebLogic Server Version: 10.3.5.0 and 10.3.4.0 .
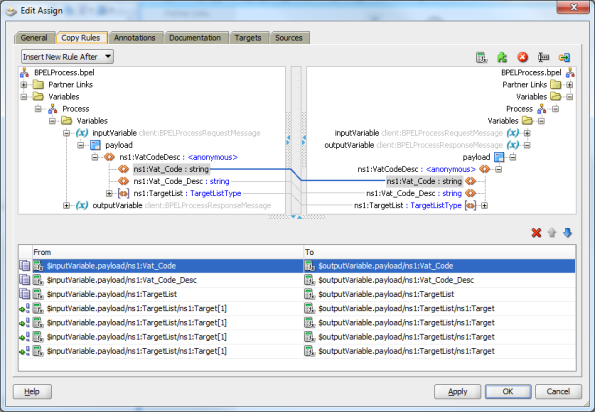
When we try to do multiple extension assign operations, only the first one will work and all the others will be ignored.
I made this simple example with 4 insert after operations.
<assign name="Assign">
	<copy>
		<from>$inputVariable.payload/ns1:Vat_Code</from>
		<to>$outputVariable.payload/ns1:Vat_Code</to>
	</copy>
	<copy>
		<from>$inputVariable.payload/ns1:Vat_Code_Desc</from>
		<to>$outputVariable.payload/ns1:Vat_Code_Desc</to>
	</copy>
	<copy>
		<from>$inputVariable.payload/ns1:TargetList</from>
		<to>$outputVariable.payload/ns1:TargetList</to>
	</copy>
	<extensionAssignOperation>
		<bpelx:insertAfter>
			<bpelx:from>$inputVariable.payload/ns1:TargetList/ns1:Target[1]</bpelx:from>
			<bpelx:to>$outputVariable.payload/ns1:TargetList/ns1:Target</bpelx:to>
		</bpelx:insertAfter>
		<bpelx:insertAfter>
			<bpelx:from>$inputVariable.payload/ns1:TargetList/ns1:Target[1]</bpelx:from>
			<bpelx:to>$outputVariable.payload/ns1:TargetList/ns1:Target</bpelx:to>
		</bpelx:insertAfter>
		<bpelx:insertAfter>
			<bpelx:from>$inputVariable.payload/ns1:TargetList/ns1:Target[1]</bpelx:from>
			<bpelx:to>$outputVariable.payload/ns1:TargetList/ns1:Target</bpelx:to>
		</bpelx:insertAfter>
		<bpelx:insertAfter>
			<bpelx:from>$inputVariable.payload/ns1:TargetList/ns1:Target[1]</bpelx:from>
			<bpelx:to>$outputVariable.payload/ns1:TargetList/ns1:Target</bpelx:to>
		</bpelx:insertAfter>
	</extensionAssignOperation>
</assign>
I tested this assign with the following input:
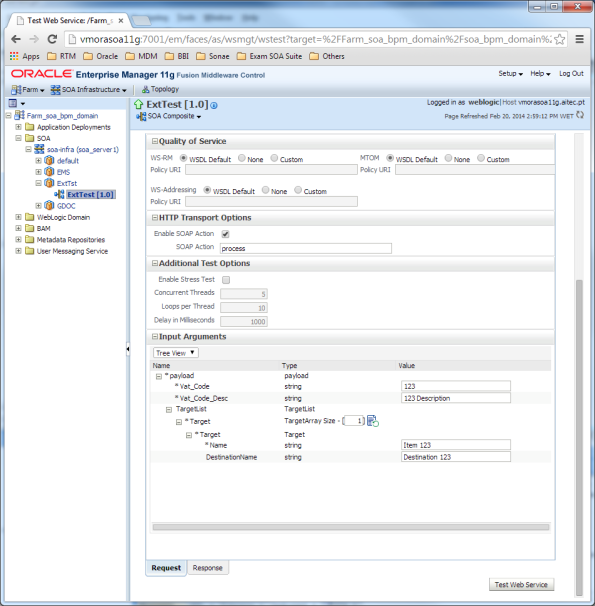
The expected result would be:
<outputVariable>
	<part  name="payload">
		<VatCodeDesc>
			<Vat_Code>123</Vat_Code>
			<Vat_Code_Desc>123 Description</Vat_Code_Desc>
			<TargetList>
				<ns1:Target>
					<ns1:Name>Item 123</ns1:Name>
					<ns1:DestinationName>Destination 123</ns1:DestinationName>
				</ns1:Target>
				<ns1:Target>
					<ns1:Name>Item 123</ns1:Name>
					<ns1:DestinationName>Destination 123</ns1:DestinationName>
				</ns1:Target>
				<ns1:Target>
					<ns1:Name>Item 123</ns1:Name>
					<ns1:DestinationName>Destination 123</ns1:DestinationName>
				</ns1:Target>
				<ns1:Target>
					<ns1:Name>Item 123</ns1:Name>
					<ns1:DestinationName>Destination 123</ns1:DestinationName>
				</ns1:Target>
				<ns1:Target>
					<ns1:Name>Item 123</ns1:Name>
					<ns1:DestinationName>Destination 123</ns1:DestinationName>
				</ns1:Target>
			</TargetList>
		</VatCodeDesc>
	</part>
</outputVariable>
But the result was :
<outputVariable>
	<part  name="payload">
		<VatCodeDesc>
			<Vat_Code>123</Vat_Code>
			<Vat_Code_Desc>123 Description</Vat_Code_Desc>
			<TargetList>
				<<ns1:Target>
					<ns1:Name>Item 123</ns1:Name>
					<ns1:DestinationName>Destination 123</ns1:DestinationName>
				</ns1:Target>
				<ns1:Target>
					<ns1:Name>Item 123</ns1:Name>
					<ns1:DestinationName>Destination 123</ns1:DestinationName>
				</ns1:Target>
			</TargetList>
		</VatCodeDesc>
	</part>
</outputVariable>
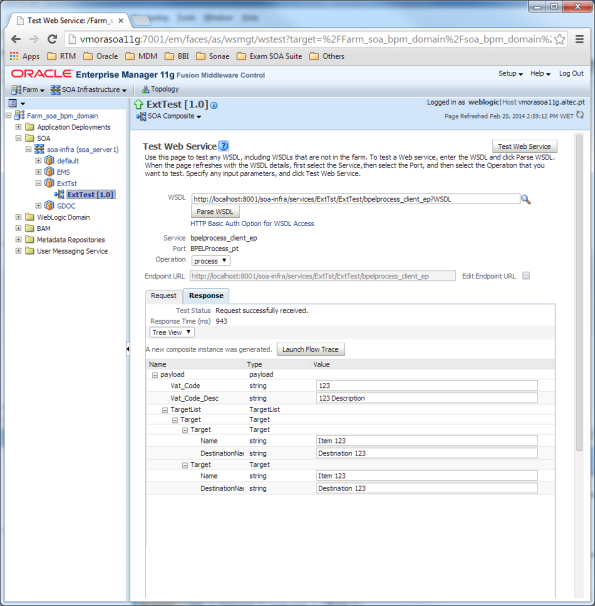
As we can see in the audit trail, the assign only made the first insert after operation and ignored the following ones.

The workaround to solve this problem is to isolate each insert after operation in different extensionAssignOperation tags.
<assign name="Assign">
	<copy>
		<from>$inputVariable.payload/ns1:Vat_Code</from>
		<to>$outputVariable.payload/ns1:Vat_Code</to>
	</copy>
	<copy>
		<from>$inputVariable.payload/ns1:Vat_Code_Desc</from>
		<to>$outputVariable.payload/ns1:Vat_Code_Desc</to>
	</copy>
	<copy>
		<from>$inputVariable.payload/ns1:TargetList</from>
		<to>$outputVariable.payload/ns1:TargetList</to>
	</copy>
	<extensionAssignOperation>
		<bpelx:insertAfter>
			<bpelx:from>$inputVariable.payload/ns1:TargetList/ns1:Target[1]</bpelx:from>
			<bpelx:to>$outputVariable.payload/ns1:TargetList/ns1:Target</bpelx:to>
		</bpelx:insertAfter>
	</extensionAssignOperation>
	<extensionAssignOperation>
		<bpelx:insertAfter>
			<bpelx:from>$inputVariable.payload/ns1:TargetList/ns1:Target[1]</bpelx:from>
			<bpelx:to>$outputVariable.payload/ns1:TargetList/ns1:Target</bpelx:to>
		</bpelx:insertAfter>
	</extensionAssignOperation>
	<extensionAssignOperation>
		<bpelx:insertAfter>
			<bpelx:from>$inputVariable.payload/ns1:TargetList/ns1:Target[1]</bpelx:from>
			<bpelx:to>$outputVariable.payload/ns1:TargetList/ns1:Target</bpelx:to>
		</bpelx:insertAfter>
	</extensionAssignOperation>
	<extensionAssignOperation>
		<bpelx:insertAfter>
			<bpelx:from>$inputVariable.payload/ns1:TargetList/ns1:Target[1]</bpelx:from>
			<bpelx:to>$outputVariable.payload/ns1:TargetList/ns1:Target</bpelx:to>
		</bpelx:insertAfter>
	</extensionAssignOperation>
</assign>
With this workaround we get the expected result.
<outputVariable>
	<part  name="payload">
		<VatCodeDesc>
			<Vat_Code>123</Vat_Code>
			<Vat_Code_Desc>123 Description</Vat_Code_Desc>
			<TargetList>
				<ns1:Target>
					<ns1:Name>Item 123</ns1:Name>
					<ns1:DestinationName>Destination 123</ns1:DestinationName>
				</ns1:Target>
				<ns1:Target>
					<ns1:Name>Item 123</ns1:Name>
					<ns1:DestinationName>Destination 123</ns1:DestinationName>
				</ns1:Target>
				<ns1:Target>
					<ns1:Name>Item 123</ns1:Name>
					<ns1:DestinationName>Destination 123</ns1:DestinationName>
				</ns1:Target>
				<ns1:Target>
					<ns1:Name>Item 123</ns1:Name>
					<ns1:DestinationName>Destination 123</ns1:DestinationName>
				</ns1:Target>
				<ns1:Target>
					<ns1:Name>Item 123</ns1:Name>
					<ns1:DestinationName>Destination 123</ns1:DestinationName>
				</ns1:Target>
			</TargetList>
		</VatCodeDesc>
	</part>
</outputVariable>


The same problem happens with all the extensionAssignOperation, such as, copyList, append, insertBefore and insertAfter. This workaround works with all of them.
Imagine you need to consume some data that has its own pagination control mechanism and you want to display it on an ADF Table with your own look and feel pagination control to get the next, previous, first and last page. The example I am presenting today can be implemented for any VO you have and the ADF Table with the custom pagination is based on a template that allows you to reuse it across the entire application. You can get more in-depth insight about “Global Template Button Strategy” here.
You can download this example here: ADFTablePagination.
The First step you need to do is to create a java interface defining the pagination operations like this:
public interface IPagination {

    /**
     * Get current Page.
     * @return the current page.
     */
    public int getCurrentPage();

    /**
     * Get the number of pages for the result list.
     * @return the number of pages for the result list.
     */
    public int getTotalPages();

    /**
     * Get the next page of results.
     * @return the next page of results.
     */
    public int getNext();

    /**
     * Get the previous page of results.
     * @return the previous page of results.
     */
    public int getPrevious();

    /**
     * Get the last page of results.
     * @return the last page of results.
     */
    public int getLast();

    /**
     * Get the first page of results.
     * @return the first page of results.
     */
    public int getFirst();

    /**
     * Indicate if there are more elements.
     * @return True - there are more elements,
     *         False - there aren't no more elements.
     */
    public boolean hasNextElement();
}
Then make sure your VO implements the “IPagination” interface like this:
// ---------------------------------------------------------------------
// ---    File generated by Oracle ADF Business Components Design Time.
// ---    Fri Jul 12 18:32:49 BST 2013
// ---    Custom code may be added to this class.
// ---    Warning: Do not modify method signatures of generated methods.
// ---------------------------------------------------------------------
public class PersonVOImpl extends WebServiceViewObjectImpl implements IPagination,
                                                                      PersonVO {

    private int page = 0;

    //Get the total pages from the service.
    //In this example we only have 4 pages.
    private int totalPages = 4;

    /**
     * This is the default constructor (do not remove).
     */
    public PersonVOImpl() {
    }

    /**
     * executeQueryForCollection - overridden for custom java data source support.
     */
    protected void executeQueryForCollection(Object qc, Object[] params,
                                             int noUserParams) {
        this.executeWebServiceQuery(new Hashtable());
        super.executeQueryForCollection(qc, params, noUserParams);
    }

    /**
     * hasNextForCollection - overridden for custom java data source support.
     */
    protected boolean hasNextForCollection(Object qc) {
        boolean bRet = super.hasNextForCollection(qc);
        return bRet;
    }

    /**
     * createRowFromResultSet - overridden for custom java data source support.
     */
    protected ViewRowImpl createRowFromResultSet(Object qc,
                                                 ResultSet resultSet) {
        ViewRowImpl value = super.createRowFromResultSet(qc, resultSet);
        return value;
    }

    /**
     * getQueryHitCount - overridden for custom java data source support.
     */
    public long getQueryHitCount(ViewRowSetImpl viewRowSet) {
        long value = super.getQueryHitCount(viewRowSet);
        return value;
    }

    protected void executeWebServiceQuery(Hashtable parameters) {
        List persons = new ArrayList();

        //This is just dummy data in order to emulate the pagination control mechanism you might have
        if (page == 0) {
            PersonPOJO person1 = new PersonPOJO("Pedro", "Gabriel", "28", "1");
            persons.add(person1);
            PersonPOJO person2 = new PersonPOJO("Steve", "Abbey", "15", "2");
            persons.add(person2);
            PersonPOJO person3 = new PersonPOJO("Andre", "Spiro", "30", "3");
            persons.add(person3);
            PersonPOJO person4 = new PersonPOJO("John", "Bertie", "45", "4");
            persons.add(person4);
            PersonPOJO person5 = new PersonPOJO("Andrew", "Alexander ", "23", "5");
            persons.add(person5);
        }
        else if (page == 1) {
            PersonPOJO person1 = new PersonPOJO("Addams", "Agnew", "28", "1");
            persons.add(person1);
            PersonPOJO person2 = new PersonPOJO("Nadir", "Samuel", "15", "2");
            persons.add(person2);
            PersonPOJO person3 = new PersonPOJO("Eadmund", "BAILA", "30", "3");
            persons.add(person3);
            PersonPOJO person4 = new PersonPOJO("Richard", "HABIBA", "45", "4");
            persons.add(person4);
            PersonPOJO person5 = new PersonPOJO("Helen", "HADRIAN ", "23", "5");
            persons.add(person5);
        }
        else if (page == 2) {
            PersonPOJO person1 = new PersonPOJO("Anthony", "Arslan", "28", "1");
            persons.add(person1);
            PersonPOJO person2 = new PersonPOJO("Austin", "Luciano", "15", "2");
            persons.add(person2);
            PersonPOJO person3 = new PersonPOJO("Blair", "Tony", "30", "3");
            persons.add(person3);
            PersonPOJO person4 = new PersonPOJO("Rebecca", "Neil", "45", "4");
            persons.add(person4);
            PersonPOJO person5 = new PersonPOJO("David", "Bowie ", "23", "5");
            persons.add(person5);
        }
        else if (page == 3) {
            PersonPOJO person1 = new PersonPOJO("Brown", "Butler", "28", "1");
            persons.add(person1);
            PersonPOJO person2 = new PersonPOJO("Carter", "Howard", "15", "2");
            persons.add(person2);
            PersonPOJO person3 = new PersonPOJO("Alexis", "Dick", "30", "3");
            persons.add(person3);
            PersonPOJO person4 = new PersonPOJO("Robert", "Cather", "45", "4");
            persons.add(person4);
            PersonPOJO person5 = new PersonPOJO("Agatha", "Christie ", "23", "5");
            persons.add(person5);
        }

        this.setMyRowset(persons.toArray());
    }

    protected void initializeAttributeMappings() {
        String classe = "PersonPOJO";
        this.getAttributeMappings().put("FirstName", classe + ".firstName");
        this.getAttributeMappings().put("LastName", classe + ".lastName");
        this.getAttributeMappings().put("Age", classe + ".age");
        this.getAttributeMappings().put("Id", classe + ".id");
    }

    public int getCurrentPage() {
        return page;
    }

    public int getTotalPages() {
        return totalPages;
    }

    public int getNext() {
        if (page < totalPages - 1) {
            page ++;
            executeQuery();
        }

        return page;
    }

    public int getPrevious() {
        if (page > 0) {
            page --;
            executeQuery();
        }

        return page;
    }

    public int getLast() {
        page = totalPages - 1;
        executeQuery();

        return page;
    }

    public int getFirst() {
        page = 0;
        executeQuery();

        return page;
    }

    public boolean hasNextElement() {
        if (page < totalPages - 1)
            return true;
        else
            return false;
    }
}
Create the template for the table with the next, previous, first and last buttons.

Implement the “TablePaginationTemplateInterface” and “TablePaginationTemplateBean”. This two classes pass the control of the buttons from the template to the page’s managed bean.
public interface TablePaginationTemplateInterface {

    public void getFirst(ActionEvent actionEvent);

    public void getPrevious(ActionEvent actionEvent);

    public void getNext(ActionEvent actionEvent);

    public void getLast(ActionEvent actionEvent);

    public Object getCurrentPage();

    public Object getTotalPages();
}
public class TablePaginationTemplateBean implements TablePaginationTemplateInterface {

private TablePaginationTemplateInterface paginationTemplate = null;

public TablePaginationTemplateBean() {
super();
}

public void getFirst(ActionEvent actionEvent) {
TablePaginationTemplateInterface bean = getBean();
bean.getFirst(actionEvent);
}

public void getPrevious(ActionEvent actionEvent) {
TablePaginationTemplateInterface bean = getBean();
bean.getPrevious(actionEvent);
}

public void getNext(ActionEvent actionEvent) {
TablePaginationTemplateInterface bean = getBean();
bean.getNext(actionEvent);
}

public void getLast(ActionEvent actionEvent) {
TablePaginationTemplateInterface bean = getBean();
bean.getLast(actionEvent);
}

public Object getCurrentPage() {
TablePaginationTemplateInterface bean = getBean();
return bean.getCurrentPage();
}

public Object getTotalPages() {
TablePaginationTemplateInterface bean = getBean();
return bean.getTotalPages();
}

private TablePaginationTemplateInterface getBean(){
if (paginationTemplate == null) {
FacesContext fctx = FacesContext.getCurrentInstance();
ELContext elctx = fctx.getELContext();
ExpressionFactory exprFactory =
fctx.getApplication().getExpressionFactory();

ValueExpression ve = exprFactory.createValueExpression(elctx, "#{attrs.tablePaginationBean}", Object.class);
Object valueObject = ve.getValue(elctx);
if (valueObject != null) {
paginationTemplate = (TablePaginationTemplateInterface)valueObject;
}
}
return paginationTemplate;
}
}
On the “Bindings” of the page that you have your table add the methods you’ve implemented for your VO.

Your page would looks like something like this:

The page’s managed bean is the one who calls the next, previous, first and last operations.
public class TablePaginationBean implements TablePaginationTemplateInterface {

    public TablePaginationBean() {
    }

    public void getFirst(ActionEvent actionEvent) {
        BindingContainer bindings = ADFUtils.getBindings();
        OperationBinding operation = bindings.getOperationBinding("getFirst");
        Object _result = operation.execute();
        System.out.println("get first");
    }

    public void getPrevious(ActionEvent actionEvent) {
        BindingContainer bindings = ADFUtils.getBindings();
        OperationBinding operation = bindings.getOperationBinding("getPrevious");
        Object _result = operation.execute();
        System.out.println("get previous");
    }

    public void getNext(ActionEvent actionEvent) {
        BindingContainer bindings = ADFUtils.getBindings();
        OperationBinding operation = bindings.getOperationBinding("getNext");
        Object _result = operation.execute();
        System.out.println("get next");
    }

    public void getLast(ActionEvent actionEvent) {
        BindingContainer bindings = ADFUtils.getBindings();
        OperationBinding operation = bindings.getOperationBinding("getLast");
        Object _result = operation.execute();
        System.out.println("get last");
    }

    public Object getCurrentPage() {
        BindingContainer bindings = ADFUtils.getBindings();
        OperationBinding operation = bindings.getOperationBinding("getCurrentPage");
        System.out.println("get Current Page");
        return operation.execute();
    }

    public Object getTotalPages() {
        BindingContainer bindings = ADFUtils.getBindings();
        OperationBinding operation = bindings.getOperationBinding("getTotalPages");
        System.out.println("get Total Pages");
        return operation.execute();
    }
}
The final result looks like this:

ADF provides you the ability to create out-of-the-box dynamic forms. Nevertheless, one of these days I have been faced with the need to have a dynamic form with regular inputText components but in some of them I needed to search information in a modal in order to fill the component with data. Based on this requirement I had to create my own dynamic form. Today I am going to explain how I have done it.
I will make use of my previous post where I have showed how to create a declarative component with modal.
You can download this example here: CustomDynamicForm.
The first step you need to do is to create a java class that retains the configurations for each row of the form. For this purpose I called it “DynamicFormElement” and is defined as:
public class DynamicFormElement {
  private String attributeName;
  private Object attributeValue;
  private String attributeLabel;
  private String attributeType;
  private boolean attributeRequired;
  private String action;
  public DynamicFormElement() {     }

public void setAttributeName(String attributeName) {
    this.attributeName = attributeName;
  }
  public String getAttributeName() {
    return attributeName;
  }

  public void setAttributeValue(Object attributeValue) {
    this.attributeValue = attributeValue;
  }

public Object getAttributeValue() {
    return attributeValue;
  }

public void setAttributeType(String attributeType) {
    this.attributeType = attributeType;
  }

public String getAttributeType() {
    return attributeType;
  }

public void setAttributeRequired(boolean attributeRequired) {
    this.attributeRequired = attributeRequired;
  }

public boolean isAttributeRequired() {
    return attributeRequired;
  }

public void setAction(String action) {
    this.action = action;
  }

public String getAction() {
    return action;
  }

public void setAttributeLabel(String attributeLabel) {
    this.attributeLabel = attributeLabel;
  }

public String getAttributeLabel() {
    return attributeLabel;
  }
}
Then create a task flow like this:

The initial method call gets the dynamic form elements with their properties. In this case I have created some dummy values.
public void getDynamicFormElements() {
customDynamicFormElements = new ArrayList();

DynamicFormElement element1 = new DynamicFormElement();

element1.setAttributeLabel("Integer");
element1.setAttributeName("attrInteger");
element1.setAttributeValue(123456789);
element1.setAttributeType("INTEGER");
element1.setAttributeRequired(true);
customDynamicFormElements.add(element1);

DynamicFormElement element2 = new DynamicFormElement();
element2.setAttributeLabel("Date");
element2.setAttributeName("attrDate");
element2.setAttributeValue(null);
element2.setAttributeType("DATE");
element2.setAttributeRequired(false);
customDynamicFormElements.add(element2);

DynamicFormElement element3 = new DynamicFormElement();
element3.setAttributeLabel("DeclComponent1");
element3.setAttributeName("attrDeclComponent1");
element3.setAttributeValue("SomeText");
element3.setAttributeType("DECLARATIVE_COMPONENT");
element3.setAttributeRequired(true);
element3.setAction("declComponent");
customDynamicFormElements.add(element3);

DynamicFormElement element4 = new DynamicFormElement();
element4.setAttributeLabel("DeclComponent2");
element4.setAttributeName("attrDeclComponent2");
element4.setAttributeValue("SomeText2");
element4.setAttributeType("DECLARATIVE_COMPONENT");
element4.setAttributeRequired(true);
element4.setAction("declComponent");
customDynamicFormElements.add(element4);
}
Then in the fragment we will iterate over the elements of the form previously populated. 
In the “Search Type Component”, the declarative component, you need to set the methods “clearActionListener”, “searchActionListener”, “searchReturnListener”, and “SearchAction”.
public void clearAL(ActionEvent actionEvent) {
    setActionsValues(actionEvent, CLEAR_ACTION);
  }

  public void searchAL(ActionEvent actionEvent) {
    setActionsValues(actionEvent, SEARCH_ACTION_LISTENER);
  }

public void searchRL(ReturnEvent returnEvent) {
    setActionsValues(returnEvent, SEARCH_RETURN_LISTENER);
  }

public String searchAction() {
    return actionModal;
  }

private void setActionsValues(FacesEvent event, String actionType) {
  try
    {
      UIComponent component = event.getComponent();
      UIComponent parentComponent = component.getParent().getParent();
      CustomComponent customComp = (CustomComponent)parentComponent;
      Object attributeName = customComp.getKeyName();

      if (!DCUtils.isNullOrEmpty(attributeName)) {
        for (int i = 0; i < customDynamicFormElements.size() ; i++) {
          DynamicFormElement formElement = customDynamicFormElements.get(i);
          if (formElement.getAttributeName().equalsIgnoreCase(attributeName.toString())) {
            if (actionType.equalsIgnoreCase(CLEAR_ACTION))
            {
              formElement.setAttributeValue(null);
              customComp.clearValue();
              break;
            }
            else if (actionType.equalsIgnoreCase(SEARCH_ACTION_LISTENER))
            {
              actionModal = formElement.getAction();
              break;
            }
            else if (actionType.equalsIgnoreCase(SEARCH_RETURN_LISTENER))
            {
              formElement.setAttributeValue(modalReturnValue);
              customComp.setValue(modalReturnValue);
              break;
            }
          }
        }
      }
  }
  catch(Exception ex) {
    ex.printStackTrace();
  }
}
The final result looks like this:

Sometimes you may feel the need to display different data and different attributes depending on the query you are performing for the same View Object. If you are feeling this need you should consider creating a Dynamic View Object. For this purpose, today I am going to show how to create a Dynamic View Object.
There are already some examples of how to create dynamic view objects like Andrejus Baranovskis have done in his blog in ADF Generator for Dynamic ADF BC and ADF UI post. In his case he created a dynamic view object based on a SQL query to the database. In my case I will show how to create a dynamic view object based on some external data (a service, a library that you already developed, and so on).
You can download this example here: DynamicViewObject.
The first step you need to take is to create a View Object. In the View Object creation wizard select the option “Rows populated programmatically, not based on a query”, click “Next” followed by “Finish”. And then expose it at the application model.
For now you have created an empty view object with no data but whether you can access in the Data Controls tab.
Next generate the classes for the Application Module.

Now it comes the dynamic VO population. In the “AppModuleImpl.java” class create the method that will trigger the VO creation at runtime. Afterwards set this method as a Client Interface in order to call it at the page that uses this VO.
private static final String DYNAMICVO_NAME = "DynamicVO1";
private static final String DYNAMICVO_PATH = "model.viewObjects.DynamicVO1";

public void createDynamicVO(String voType) {
    List dynamicVOAttributes = getDynamicVOAttributes(voType);

    //Get a new View Object Definition.
    ViewDefImpl dynamicVODef = new ViewDefImpl(DYNAMICVO_PATH);

    //Get the current View Object instance.
    ViewObjectImpl dynamicVO = (ViewObjectImpl)findViewObject(DYNAMICVO_NAME);

    //Remove the current View Object instance.
    dynamicVO.remove();

    //Create a new View Object based on the new ViewDefImpl previously created.
    dynamicVO = (ViewObjectImpl)this.createViewObject(DYNAMICVO_NAME, dynamicVODef);

    //Create the attributes for the new ViewDefImpl.
    //The attributes created over the the ViewDefImpl, at this point, get passed to the ViewObjectImpl.
    List readOnlyTaskPayloadItems = createDynamicVOAttributes(dynamicVODef, dynamicVOAttributes);

    //Populates the attributes' values.
    populateDynamicVOAttributes(dynamicVO, dynamicVOAttributes);

    //Set the read only attributes.
    setReadOnlyDynamicVOAttributes(dynamicVODef, readOnlyTaskPayloadItems);
}
The “CreateDynamicVOAttributes” method creates the attributes for the view Object. All attributes must be created as “Updatable” in order to set their values, otherwise you’ll get an error saying that you cannot update read only attributes.
private List createDynamicVOAttributes(ViewDefImpl dynamicVODef, List dynamicVOAttributes) {
    List list = new ArrayList();
    try
    {
        if(dynamicVOAttributes.size() > 0) {
            for(int i = 0; i < dynamicVOAttributes.size(); i++) {
                 DynamicVOAttribute dynamicVOAttribute = dynamicVOAttributes.get(i);
                 if (dynamicVOAttribute.isReadOnly())
                     list.add(dynamicVOAttribute);

                 Class itemClass = getTypeClass(dynamicVOAttribute.getType());
                 byte updateable = getByteUpdateable(true);
                 AttributeDefImpl attribute = dynamicVODef.addViewAttribute(dynamicVOAttribute.getName(), dynamicVOAttribute.getName(), itemClass);
                 attribute.setProperty(AttributeHints.ATTRIBUTE_LABEL, dynamicVOAttribute.getName());
                 attribute.setMandatory(dynamicVOAttribute.isRequired());
                 attribute.setUpdateableFlag(updateable);
            }
        }
        dynamicVODef.resolveDefObject();
        dynamicVODef.registerDefObject();
    }
    catch (Exception ex) {
        ex.printStackTrace();
    }
    return list;
}
The “populateDynamicVOAttributes” method set the dynamic VO attributes values.
private void populateDynamicVOAttributes(ViewObjectImpl dynamicVO, List dynamicVOAttributes) {
    try
    {
        if(dynamicVOAttributes.size() > 0 ) {
            Row notifDinamicaPayloadVORow = dynamicVO.createRow();

            for (int i = 0; i < dynamicVOAttributes.size(); i++)
            {
                DynamicVOAttribute payloadItem = dynamicVOAttributes.get(i);
                notifDinamicaPayloadVORow.setAttribute(payloadItem.getName(), payloadItem.getValue());
            }
            dynamicVO.insertRow(notifDinamicaPayloadVORow);
         }
    }
    catch (Exception ex) {
         ex.printStackTrace();
    }
}
The “setReadOnlyDynamicVOAttributes” set “UpdateableFlag” property to false for read only attributes.
private void setReadOnlyDynamicVOAttributes(ViewDefImpl dynamicVODef, List readOnlyAttributes) {
    try
    {
        for(int i = 0; i < readOnlyAttributes.size(); i++)
        {
            DynamicVOAttribute payloadItem = readOnlyAttributes.get(i);

            byte updateable = getByteUpdateable(false);

            int indexAttribute = dynamicVODef.getAttributeIndexOf(payloadItem.getName());
            AttributeDefImpl attribute = (AttributeDefImpl)dynamicVODef.getAttributeDef(indexAttribute);
            attribute.setUpdateableFlag(updateable);
        }
    }
    catch (Exception ex) {
        ex.printStackTrace();
    }
}
Auxiliar methods.
private Class getTypeClass(int type) {
    Class result;
    switch(type){
       case 0:
         result = Integer.class;
         break;
       case 1:
         result = String.class;
         break;
       case 2:
         result = Date.class;
         break;
       default:
         throw new IllegalArgumentException("Not Suported Type: " +  type);
    }
    return result;
}

private byte getByteUpdateable(boolean updateable) {
    byte result;

    if (updateable)
        result = AttributeDef.UPDATEABLE;
    else
        result = AttributeDef.READONLY;

    return result;
}
Then set the task flow with two pages, one that calls the “createDynamicVOAttributes” (Home page) and other that displays the data filtered (DynamicVO).

Both Home and DynamicVo pages has the following content:

After dragging and drop the dynamic VO as a Dynamic Form into the page you will get the next result.

During an ADF application development sometimes you probably find yourself doing the same set of specific components more than once in different pages or even in the same page. If you are facing this issue or already have faced it you should consider using Declarative Components. With declarative components you developed once are use it whenever or wherever you want.
Today I will demonstrate how to develop a declarative component with an inputText that receives the result of searching for data in a modal, and a button to erase the data in the underlying inputText.

You can download this example here: DeclarativeComponents.
First of all create a Generic Application with an ADF ViewController Project . After this you will get a normal ADF project but without the ADF Model Project. Then select to create an ADF Declarative Component and set the following values:

Don’t forget to check the “Use Custom Component Class” checkbox and setting the desired name. This class exposes the java methods that afterwards can be invoked by the managed bean of the page that consumes this declarative component. In the same window you can set the attributes and methods, but I will make it right after “jspx” page have been created. Then set the following attributes and methods:


In order to know the “Method Signature” for each method inserted you just need to see the component’s documentation, in this case the inputText component. A quick and easy way to do it is to use the provided short cuts. For example drag and drop an inputText, put the cursor over it and press CTRL + D.
Next step the following layout and components to the declarative component:

Then set “CustomComponent.java” class with the following code. Here you can expose all the methods you want to use it later in the consumer page.
package component;

import common.DCUtils;
import java.util.Iterator;
import java.util.List;
import javax.faces.component.UIComponent;
import oracle.adf.view.rich.component.rich.fragment.RichDeclarativeComponent;
import oracle.adf.view.rich.component.rich.input.RichInputText;
import oracle.adf.view.rich.component.rich.output.RichOutputText;

public class CustomComponent extends RichDeclarativeComponent {

    private static final String OUTPUT_TEXT_ATTR_NAME = "outputText_AttributeName";
    private static final String INPUT_TEXT_VALUE = "inputText_Value";

    public CustomComponent() {
    }

    public Object getKeyName() {
        Object result = null;
        try
        {
            RichOutputText inputValue = (RichOutputText)getUIComponent(OUTPUT_TEXT_ATTR_NAME);
            result = inputValue.getValue();
        }
        catch(Exception ex)
        {
            ex.printStackTrace();
        }
        return result;
    }

    public Object getLabel() {
        Object result = null;
        try
        {
            RichInputText inputValue = (RichInputText)getUIComponent(INPUT_TEXT_VALUE);
            result = inputValue.getLabel();
        }
        catch(Exception ex)
        {
            ex.printStackTrace();
        }
        return result;
    }

    public Object getValue() {
        Object result = null;
        try
        {
            RichInputText inputValue = (RichInputText)getUIComponent(INPUT_TEXT_VALUE);
            result = inputValue.getValue();
        }
        catch(Exception ex)
        {
            ex.printStackTrace();
        }
        return result;
    }

    public void setValue(Object value) {
        try
        {
            RichInputText inputValue = (RichInputText)getUIComponent(INPUT_TEXT_VALUE);
            inputValue.setSubmittedValue(value);
            inputValue.setValue(value);
            DCUtils.refreshComponent(inputValue);
        }
        catch (Exception ex)
        {
            ex.printStackTrace();
        }
    }

    public void setValuetDisabled(boolean disabled) {
        try
        {
            RichInputText inputValue = (RichInputText)getUIComponent(INPUT_TEXT_VALUE);
            inputValue.setDisabled(disabled);
            DCUtils.refreshComponent(inputValue);
        }
        catch (Exception ex)
        {
            ex.printStackTrace();
        }
    }

    public void clearValue() {
        try
        {
            RichInputText inputValue = (RichInputText)getUIComponent(INPUT_TEXT_VALUE);
            inputValue.setSubmittedValue(null);
            inputValue.setValue(null);
            DCUtils.refreshComponent(inputValue);
        }
        catch (Exception ex)
        {
            ex.printStackTrace();
        }
    }

    private UIComponent getUIComponent(String componentId) {
        try
        {
            List children = this.getChildren().get(0).getChildren();
            Iterator iterator = children.iterator();

            while (iterator.hasNext())
            {
                UIComponent component = iterator.next();
                if (component.getId().equalsIgnoreCase(componentId))
                    return component;
            }
        }
        catch (Exception ex)
        {
            ex.printStackTrace();
        }
        return null;
    }
}
After this you have finished developing your declarative component. But before using it do the following steps: (1) create an “ADF Library Jar File” deployment plan; (2) include the generated jar in your ADF application. After this whenever you create a page in your ADF application you select your declarative component from the component palette. The consumer page I have created looks like this:

Next you need to implement the methods for each operation of the declarative component. The Home’s managed bean is this:
package view;

import component.CustomComponent;
import javax.faces.event.ActionEvent;
import oracle.adf.view.rich.component.rich.fragment.RichDeclarativeComponent;
import org.apache.myfaces.trinidad.event.ReturnEvent;

public class Home {
    private Object value;
    private Object returnValue;
    private RichDeclarativeComponent customComponent;

public Home() {     }

     public void clearActionListener(ActionEvent actionEvent) {
         //Get CustomComponent class to acess its methods.
         CustomComponent component = (CustomComponent)customComponent;

         //Clears CustomComponent value but not the value passed to the component.
         component.clearValue();

         //You need to reset the value passed to the component,
         //otherwise it won't get cleaned.
         value = null;
    }

    public String searchAction() {
         return "search";
    }

    public void searchReturnListener(ReturnEvent returnEvent) {
         //Get CustomComponent class to acess its methods.
         CustomComponent component = (CustomComponent)customComponent;

         //Set CustomComponent with the new value.
         component.setValue(returnValue);

         //You need to set the value with new returned value,
         //otherwise you won't get it updated.
         value = returnValue;
    }

    public void searchActionListener(ActionEvent actionEvent) {
        // Add event code here with you need to perform previous
        // data computation
    }

    public void setValue(Object value) {
        this.value = value;
    }

    public Object getValue() {
        return value;
    }

    public void setReturnValue(Object returnValue) {
        this.returnValue = returnValue;
    }

    public Object getReturnValue() {
        return returnValue;
    }

    public void setCustomComponent(RichDeclarativeComponent customComponent) {
        this.customComponent = customComponent;
    }

    public RichDeclarativeComponent getCustomComponent() {
        return customComponent;
    }
}
The final result looks like this:

In most cases making use of Contextual Events in order to gather and send information between ADF regions may become hard to reach what we really want to achieve. In order to overcome this situation, today we will demonstrate how to accomplish ADF Regions’ communication by using ADF default out of the box functionalities.
You can download two slightly different versions of this example here: CommunicationBetweenRegions1, CommunicationBetweenRegions2.
For this example we created three regions, one we called “ParentsRegion” which gathers and publish information from/to the other two regions (“Region A” and “Region B”). The first step is to create ADF Task Flows, one for each region:

Then create the “Managed Beans” for each new ADF Task Flow. In “ParentsRegion” managed bean create new global variables to reference “RegionA” and “RegionB” managed beans. In “RegionA” and “RegionB” make the same but this time to reference “ParentsRegion” managed Bean. The “initFlow” method in “RegionA” and “RegionB” initializes the parent’s region variable. This double reference will allow you to gather and publish information between regions.
package CommunicationBetweenRegions;
import Common.Utils;
import javax.faces.event.ActionEvent;
import oracle.adf.view.rich.component.rich.output.RichOutputText;

public class ParentsRegion {

    private RegionA regionA;
    private RegionB regionB;

    private String yourName;
    private RichOutputText outputTextYourName;

    public void setRegionA(RegionA regionA) {
        this.regionA = regionA;
    }

    public RegionA getRegionA() {
        return regionA;
    }

    public void setRegionB(RegionB regionB) {
        this.regionB = regionB;
    }

    public RegionB getRegionB() {
        return regionB;
    }

    public void commandButtonClean(ActionEvent actionEvent) {
        yourName = null;
        regionA.cleanFirstName();
        regionB.cleanLastName();
    }

    public void commandButtonSubmit(ActionEvent actionEvent) {
        yourName = regionA.getFirstName() + " " + regionB.getLastName();
        Utils.refreshComponent(outputTextYourName);
    }

    public void setYourName(String yourName) {
        this.yourName = yourName;
    }

    public String getYourName() {
        return yourName;
    }

    public void setOutputTextYourName(RichOutputText outputTextYourName) {
        this.outputTextYourName = outputTextYourName;
    }

    public RichOutputText getOutputTextYourName() {
        return outputTextYourName;
    }
}
package CommunicationBetweenRegions;

import Common.Utils;

import oracle.adf.view.rich.component.rich.input.RichInputText;

public class RegionA {

    private ParentsRegion parentsRegionManagedBean;

    private String firstName = "";
    private RichInputText inputText_RegionA;

    public void initFlow() {
        this.parentsRegionManagedBean.setRegionA(this);
    }

    public void setParentsRegionManagedBean(ParentsRegion parentsRegionManagedBean) {
        this.parentsRegionManagedBean = parentsRegionManagedBean;
    }

    public ParentsRegion getParentsRegionManagedBean() {
        return parentsRegionManagedBean;
    }

    public void cleanFirstName() {
        this.firstName = "";
        Utils.refreshComponent(inputText_RegionA);
    }

    public void setFirstName(String firstName) {
        this.firstName = firstName;
    }

    public String getFirstName() {
        return firstName;
    }

    public void setInputText_RegionA(RichInputText inputText_RegionA) {
        this.inputText_RegionA = inputText_RegionA;
    }

    public RichInputText getInputText_RegionA() {
        return inputText_RegionA;
    }
}
package CommunicationBetweenRegions;

import Common.Utils;

import oracle.adf.view.rich.component.rich.input.RichInputText;

public class RegionB {

    private ParentsRegion parentsRegionManagedBean;

    private String lastName = "";
    private RichInputText inputText_LastName;

    public void initFlow() {
        this.parentsRegionManagedBean.setRegionB(this);
    }

    public void setParentsRegionManagedBean(ParentsRegion parentsRegionManagedBean) {
        this.parentsRegionManagedBean = parentsRegionManagedBean;
    }

    public ParentsRegion getParentsRegionManagedBean() {
        return parentsRegionManagedBean;
    }

    public void cleanLastName() {
        this.lastName = "";
        Utils.refreshComponent(inputText_LastName);
    }

    public void setLastName(String lastName) {
        this.lastName = lastName;
    }

    public String getLastName() {
        return lastName;
    }

    public void setInputText_LastName(RichInputText inputText_LastName) {
        this.inputText_LastName = inputText_LastName;
    }

    public RichInputText getInputText_LastName() {
        return inputText_LastName;
    }
}
Next you need to set “RegionA” and “RegionB” ADF Task Flow parameters based on previously created global variables.

Then create the page fragments, drag and drop “RegionA” and” RegionB” into “ParentsRegion” and finally define the input parameters for both regions as shown:

Now at runtime you can gather and clean the information on “RegionA” and “RegionB” while you click on “ParentsRegion” buttons.

Pedro Gabriel